How to Manage Chicks from 0 weeks to 8 weeks
Brooding is the period immediately after hatching when the chicks need special care and management for their survival.
Bringing in new chicks indicates that you are ready to start the journey into poultry farming. How you handle day-old chicks in their first weeks will affect productivity in the future. This means how the chickens gain weight in the future or egg-laying productivity in the future. It is important to handle this phase properly and with uttermost care because it will reflect on the success of your poultry business
In natural brooding, the mother hen provides heat for the chicks. This is because young chicks are not able to heat their bodies naturally. In an artificial brooding, the poultry farmer will need to provide some form of heat. Lack of adequate food, water, and the right temperature will lead to poor development of the chicks in the brooder, diseases and even death.
The main purpose of brooding is to provide the correct temperature for the chicks. Without the correct body temperature, the chick will not take adequate food and water. This leads to poor growth, retardation and poor development of internal development, resulting in poor productivity in the future. Proper brooder management is the main part of day-old chick management.
Preparing to receive day new chicks
It is crucial for the poultry farmer to source their chicks from a reputable breeder. This will ensure that the chicks are handled well, vaccinated and disease free from the point of purchase.
The poultry farmer will need to isolate the brooding station from other older birds. This helps prevent injury as the older birds might want to feed with the newly acquired chicks. To prevent diseases spread through footwear, foot baths should be placed at the entrance.
The brooding house should be thoroughly dry and wet cleaned. Disinfection should be done on all the equipment that will be used. This includes feeders and drinkers.
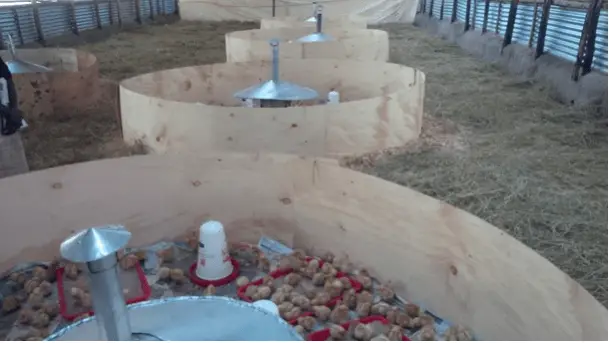
Wood shaving should be used as litter. Never use sawdust, as the chicks will feed on it. They will not be able to digest it and this will lead to death. Spread the litter in the brooding ring and disinfect it by spraying a disinfectant.
The feeders and drinkers should be arranged in such a way that there will be no crowding. Make sure you test that the heat source and brooding ring are in good working conditions before bringing in the new chicks.
On arrival, provide clean drinking water mixed with glucose and liquid paraffin. The clean water hydrates the birds and the glucose provides energy. The liquid paraffin will help prepare the digestive tract and prevent constipation once the chicks start feeding. Chick feed should only be provided 30 minutes after arrival. This will give the chicks ample time to take the water, glucose and liquid paraffin solution.
The brooding ring should be heated at least one hour before the birds arrive so as to attain the optimal temperature for chicks. This is 32 degrees Celsius.
Count the chicks on arrival so as to know how many chicks were alive at the beginning. This will enable the chicken farmer to track the mortality rate.
Before releasing the chicks into the brooder, dip their beaks in water.
For the first 3 days, the poultry farmer should observe the chicks in the brooder to ensure they are drinking water and feeding properly. The observation should be done every 3 hours for the first 3 days.
Continuous light should be provided for the first 72 hours. This is to ensure that the chicks are able to find food and water. Provide enough space, feeders and drinking stations. Make sure that the chicks have optimal lighting and ventilation.

Brooder ring. Photo courtesy of Eggprenuer Initiative(eggprenuer.com)
Types of brooders
As mentioned before, the importance of a brooder is to provide the correct temperature for the chicks to thrive. The types of brooders are categorized depending on the heat source.
These are :
- Charcoal Burner brooders
- Kerosene Lamp brooders
- Electricity bulb brooders
- Gas Burner brooders
How to build a brooder ring
- Cut an 8 by 4 hardboard into 2 equal parts in length.
- Join the 2 boards to form a circle.
- The 2 boards should be held together with pegs to allow for expansion.
- Fill in the brooder ring with suitable litter material up to 4 inches (10 cm) from the floor. This can be wood shavings or straw. Never use sawdust
- After disinfecting the litter material, spread newspapers to cover the floor.
- Place the heat source at the centre of the brooder ring.
- Expand the ring regularly to create more space as the chicks grow.
Brooder ring dimensions
The size of the brooder ring is determined by the number of chicks.
- for a brooder size for 50 chicks, the diameter should be 50 feet. The estimated number of hard boards is one.
- for a brooder size for 100 chicks, the diameter should be 10 feet. The estimated number of hard boards is one and a half.
- for a brooder size of 150 chicks, the diameter should be 15 feet. The estimated number of hard boards is 2.
- for a brooder size of 200 chicks, the diameter should be 20 feet. The estimated number of hard boards is two and a half.
Brooder Heat sources
It is recommended that the heat source be safe and adequate for the number of chicks in the brooder.
- For 100 birds, you can use a domestic charcoal heater (jiko).
- For 250 birds, you can use an infrared bulb of 250 watts.
- For 100 birds you can use a pancake heater.

Brooder ring. Photo courtesy of Eggprenuer Initiative(eggprenuer.com)
Continuous chick examination and brooder management
The poultry farmer should monitor the chick’s behaviour to ascertain if they are comfortable and feeding well.
The correct temperature of 32 degrees Celsius is measured 5cm above the litter. In the absence of a thermometer, the behaviour of the chicks can be observed so as to adjust to the correct temperature.
The best time to observe the chicks for temperature adjustment is in the evening. The chicks should be evenly spread across and around the brooding ring. If they are crowing near the heat source, it means that the brooder is too cold. If they are crowding away from the heat source, it means the brooder is too hot. If the chicks crowd on a straight line between the heat source and the edge of the brooding ring on one side, then it is too draughty (windy). Adjust the brooder, heat source and ventilation until the chicks are spread evenly around the brooder.
An important point to note is that the temperature should be reduced by 3 degrees Celsius each week for the 8 weeks the chicks will be in the brooder.
The crops of the chicks should be examined 12 hours after their arrival. This is to ensure that they have located the food and water. If 95% of the crop is soft and pliable, it means the chicks have located the water and feed and are feeding and drinking well. If the crops are hard, it means they have not located the water. If the crops are swollen and distended it means the chicks have not located the feeds. The feeding trays and drinkers should be rearranged to ensure they are accessible to the chicks.
For the chicks to locate feed easily, it is recommended to use open feeding trays. A supplemental feeding tray measuring 30 by 45 cm (1 foot by 1.5 feet ) per 100 chicks should be placed between the main feeder and drinkers adjacent to the heat source. The supplemental open feeders should only be providers for the first 7-10 days.
Poultry farmers should realize that there is a risk of fire in the brooder, especially when charcoal and wood are used as heat sources. The poultry farmer should take necessary precautions to mitigate the risk of fire in the brooder.
At about 8 weeks the chicks will have developed enough feathers to warm their bodies. It is time to move them from the brooder to a coop.



The article is clear and…
The article is clear and easy to understand thanks for your meaningful information
Thank you so much.This has…
Thank you so much.This has been very helpful
Thanks for the right…
Thanks for the right information on the broader.
tks for the brooding lesson…
Thanks for the brooding lesson. Please can you send me more information on poultry farming
VERY HELPFUL, THANK YOU
VERY HELPFUL, THANK YOU
Good article
Good article
Very informative and easy…
Very informative and easy to understand . Thanks
Send me brooder management…
Send me brooder management and setting up a brooder
Thank you for your interest…
Thank you for your interest in brooder management. Please clarify what exactly you want us to send.
i have 300 layers but am…
i have 300 layers but am planning to have 1000 layers. Can i get more information on the same?
You do provide very…
You do provide very educative materials for beginners. Thanks
very good thanks
very good thanks